

1.Introduction
The Rallycheck Management Portal is specifically designed for organizers of rallies. In the Portal you can manage all your rallies. The Portal is online at: https://my.rallycheck.com. In order to log on to the Portal you must have the required credentials.
The Rallycheck Portal has a number of functions that can help the rally organization during the three phases of a rally.
Before the start of a rally:
- Creating a rally
- Placement of controls on the road map
- Creating the mother Route Control Card
- Adding Participants to a rally
During the rally:
- Following the rally in real time
- Contact with participants
At the end of the rally:
- List of all finished participants
- Update mother Route Control card if needed
- Optionally calculate the results
- Publish the results
In this Manual we will describe all the functions of the Portal and als list the best practices when using Rallycheck for a successful rally!
2.Overview

The Rallycheck platform consists of a number of elements. See the above image for an overview of the components and the way they connect.
3.Registering for the Portal
In order to use the Rallycheck Portal you will have to register for an account to access the Portal.
Access to the Portal is done using the same credentials as for the Rallycheck app. Before registering for the Portal, please download the Rallycheck app and create an account.
The next step is to apply for a Rallycheck account for rally organizations. This can be done at https://my.rallycheck.com. Please select the “New Registration” option.
Then fill in the form and submit your application.
4.Login to the Portal
Go to https://my.rallycheck.com to log in to the Rallycheck Portal. You will see the following screen:
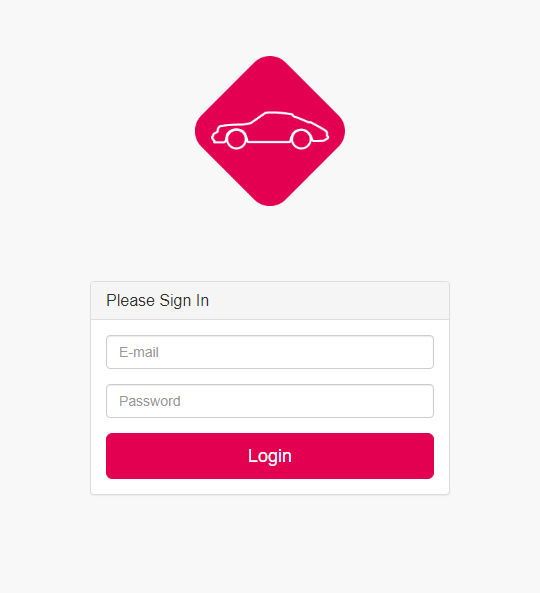
Enter the same email and password as you used to register in the Rallycheck app.
You can log in to the Portal after you have received notification that your Portal account has been activated.
5.1.Edit Rally
The Edit Rally page enables you to enter information pertaining to the rally itself. The page consists of up to seven tabs, each with a specific function. Depending on your privileges you may not see all tabs.

General
General information such as name, description etc.
Media
Digital media such as rally shield etc.
File Management
Upload documents you want to send to Participants after they finish a rally Stage.
Classes
Define the classes of the rally.
Legs & Stages
Define the Legs and Stages of the rally.
Penalty points
Configuration of the penalty points of a rally.
Results calculation
Configuration of the results calculation.
Image Gallery
A gallery of images that can be used as controls in the rally.
Admin settings
Reserved for administrators.
5.1.1.General settings
On this tab you can set the general settings for your rally.
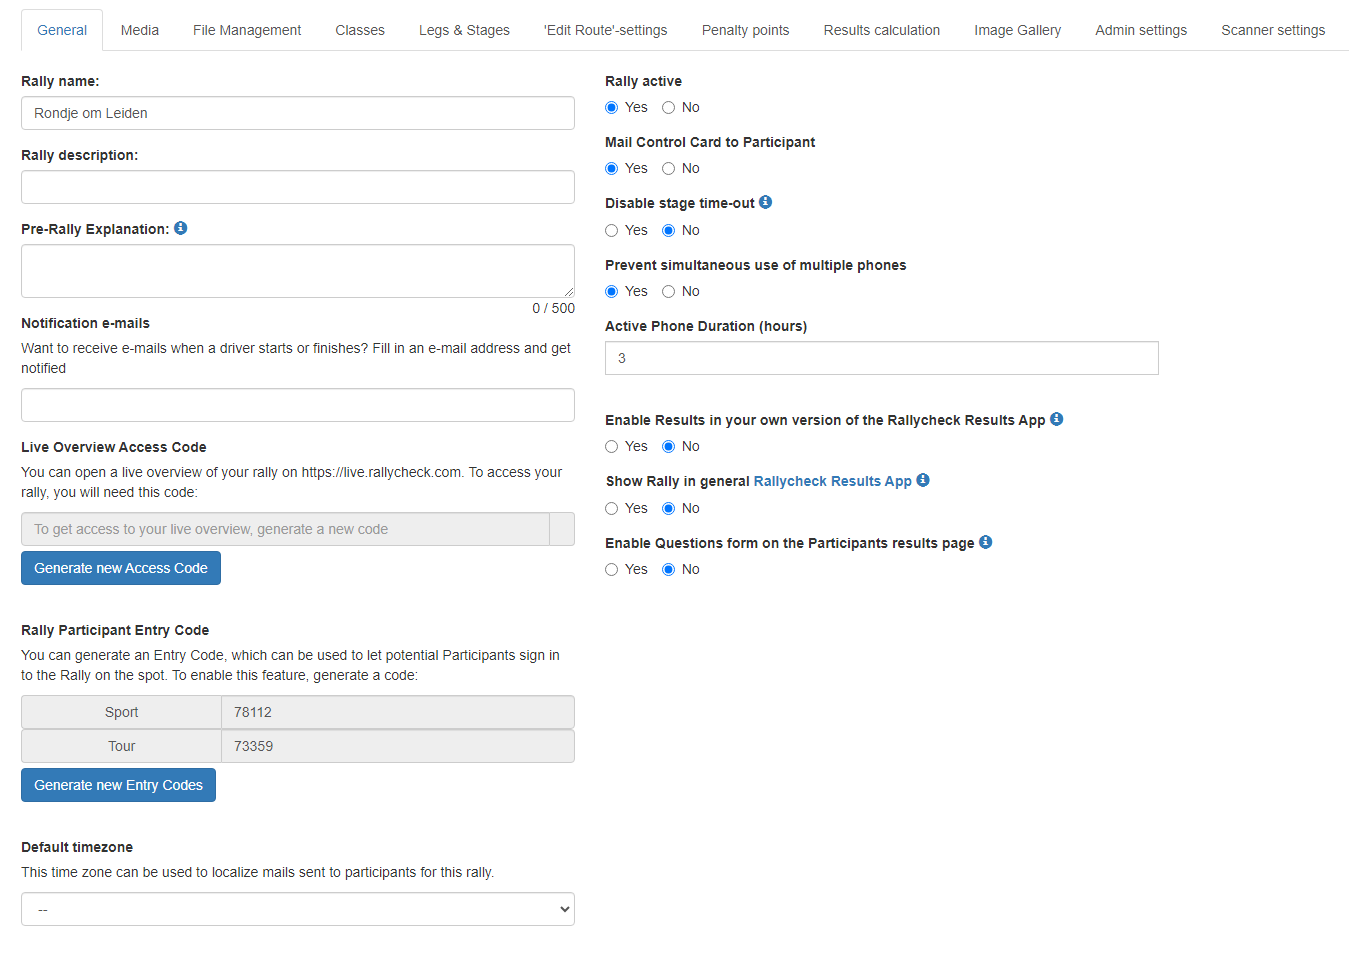
Rally name
The Rally name can be entered here and is shown in the Rallycheck app and on all email communication and prints.
Rally description
Rally description is a free text field for you own purpose. It is not used in the system.
Pre-Rally Explanation
The Pre-Rally Explanation will be shown to participants selecting this rally in the Rallycheck app in the case that the rally is not yet active.
Notification email
Enter the email address of the account which will receive all email notifications pertaining to the rally. An email will be sent at the start of a stage of each competitor and at the finish of each stage.
Live Overview Access Code
With the live overview, you can watch the rally in real time. The position of the participants are plotted on screen. This can be usefull for projecting an image of the rally at the Start or Finish location.
Rally Participant Entry Code
You can generate an Entry Code, which can be used to let potential Participants sign in to the Rally on the spot.
Default timezone
This is the default timezone for the rally. Use this only when the rally spans multiple timezones. This funtion is partially implemented.
Rally active
This field is used to set the rally to active (or inactive).
When a rally is active, it is visible in the Rallycheck app and can be selected bij all users of the app.
Mail Control Card to Participant
This field enables the option to send a Route Control Card to the Participant directly after finishing a Stage. When this option is set to No, no mail will be sent to the participant. The “resend mail” option in the results page is also disabled.
Disable Stage time-out
The stage of a participant is closed automatically if no waypoint is hit for several hours. Disabling this time-out lets participants resume an unfinished rally stage after any amount of time. We recommend disabling the time-out if you want to let participants drive a stage over multiple days.
Prevent simultaneous use of multiple phones
When this option is enabled, an account can only be used by one phone. It will not be possible to select the same rally with the same account at the same time on another phone. The amount of overlap is defined in the Active phone duration.
Active phone duration
This represents the number of hours that a second phone, with the same user account, cannot select the same rally as the first phone.
Enable Results in your own version of the Rallycheck Results App
With Rallycheck you can publish results on your own version of the Rallycheck results app.
Enable Questions form on the Participants results page
This option can be set if a ticket system has been installen d for your organisation. Please contact Rallycheck if this is an option you would like to use.
5.1.2.Media settings
On this tab you can enter digital media and documents for your rally.
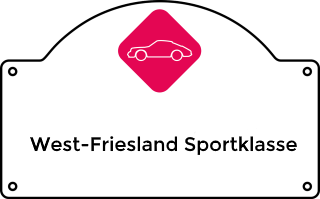
Upload rally shield
After completing the rally a competitor receives an email message with an overview of their control card. Basically all the controls that are also seen on the smartphone. At the top of the email there is room to place your rally’s rally sign.
The digital rally sign has the following dimensions: 320 x 199 pixels.
The digital rally sign is a .png file. See the following example.
Upload rally icon
In the Rallycheck app a competitor can select a rally. The app shows the name of the rally preceded by a logo of the rally.
The logo has the following format: 140 x 140 pixels.
The digital logo is a .jpg file. See the following example.

5.1.3.File Management
On this page you can upload the documents you want to send to participants after they finish a stage of the rally. You can specify which documents to send after which Stage and also to which Classes.
Click on the “Add document” button to add a new document to the list.
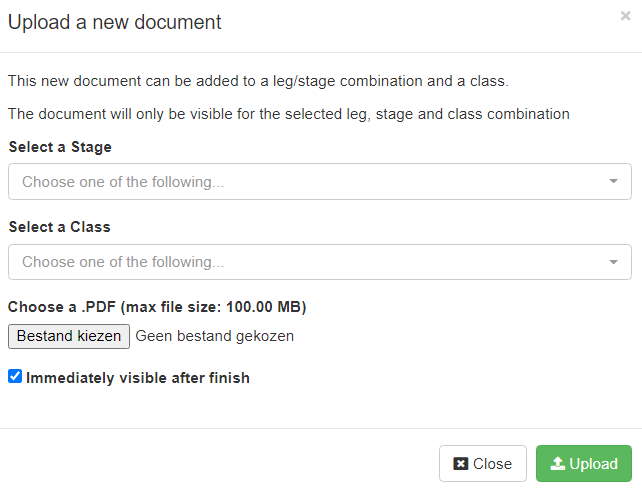
Select a Leg / Stage combination after which the document will be sent to a Participant
Select the relevant Class for the document.
Select the document from your computer. the maximum file size is currently set to 100MB per file.
By default the document is visible immediately after the Participant passes the Finish control. You may also chose a date and time for showing the documents. Using the date and time will enable you to delay viewing of documents until after all (or most) Participants have finished the Stage.
Click the “Upload” button to add the document to the list of documents.
5.1.4.Rally Classes
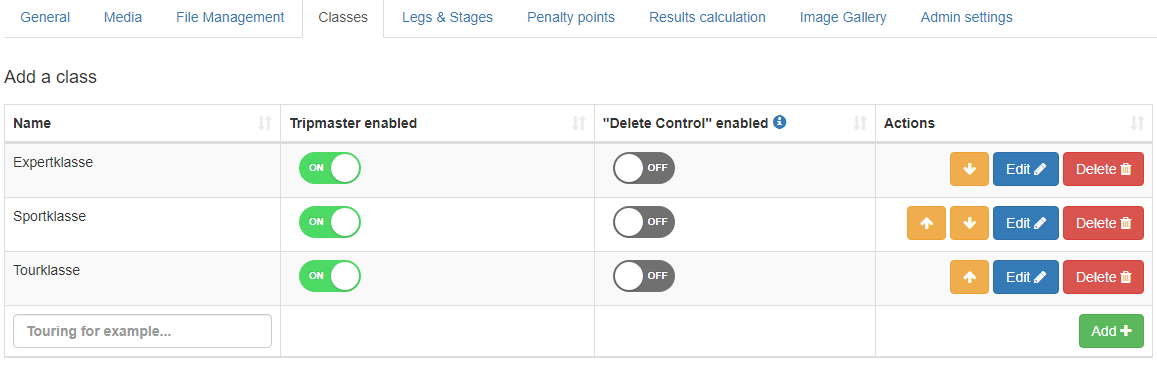
On the Classes tab you can define the different Classes in which Participants can enter the rally.
A rally must have at least one Class, the default Class when creating a new rally is “Touring”.
An organizer can activate the Tripmaster function in the Rallycheck app. This can be done per Class. In the example above, all classes are allowed use of the GPS Tripmaster in the Rallycheck.
The default value for the Tripmaster is ON.
An organiser can also activate “Delete Control” enabled. This enables participants to delete the most recent Passage Control in the Rallycheck app. Time controls and controls with the option “Direct Save” can’t be deleted by participants.
5.1.5.Legs & Stages
A rally must have at least one Leg and one Stage. We have noticed that the terms “Leg” and “Stage” are often used with rallies, but are not always applied the same way. In order to be sure how to use Legs and Stages we have added our definition for use within the Rallycheck application.
Rally start and end date/time
A rally may have an optional starting date/time and an optional ending date/time.
We advise all rallies that have an actual starting date, to enter this in Rallycheck.
The rally usually has a fixed date with an organization and a lot of competitors that drive the rally at the same time.
Rallies that do not have a fixed date are usually configured so that Participants can drive the rally at their own convenience. This type of rally is available all year round and can be driven at will. Usually this is done on an individual basis or in small groups of participants.
Rallies without a fixed date are an exception.
Definition of a rally Leg
A rally Leg consists of a name. Usually there is one leg per day.
This is not mandatory. You may define more legs per day.
A rally Leg must have at least one stage.
Definition of a rally Stage
A rally Stage consists of a name and an optional starting and ending date and time. Also a rally stage is linked to (at least) one or more Classes. A rally stage is also linked to one (and only one) Route Control Card per Class.
Typical configuration of a one day rally with two classes
The typical configuration of a one day rally with two classes could be:
Leg 1 (Saturday):
- Morning stage (Sporting and Touring classes)
- Afternoon stage (Sporting and Touring classes)
Example of a two day rally with 3 Classes:
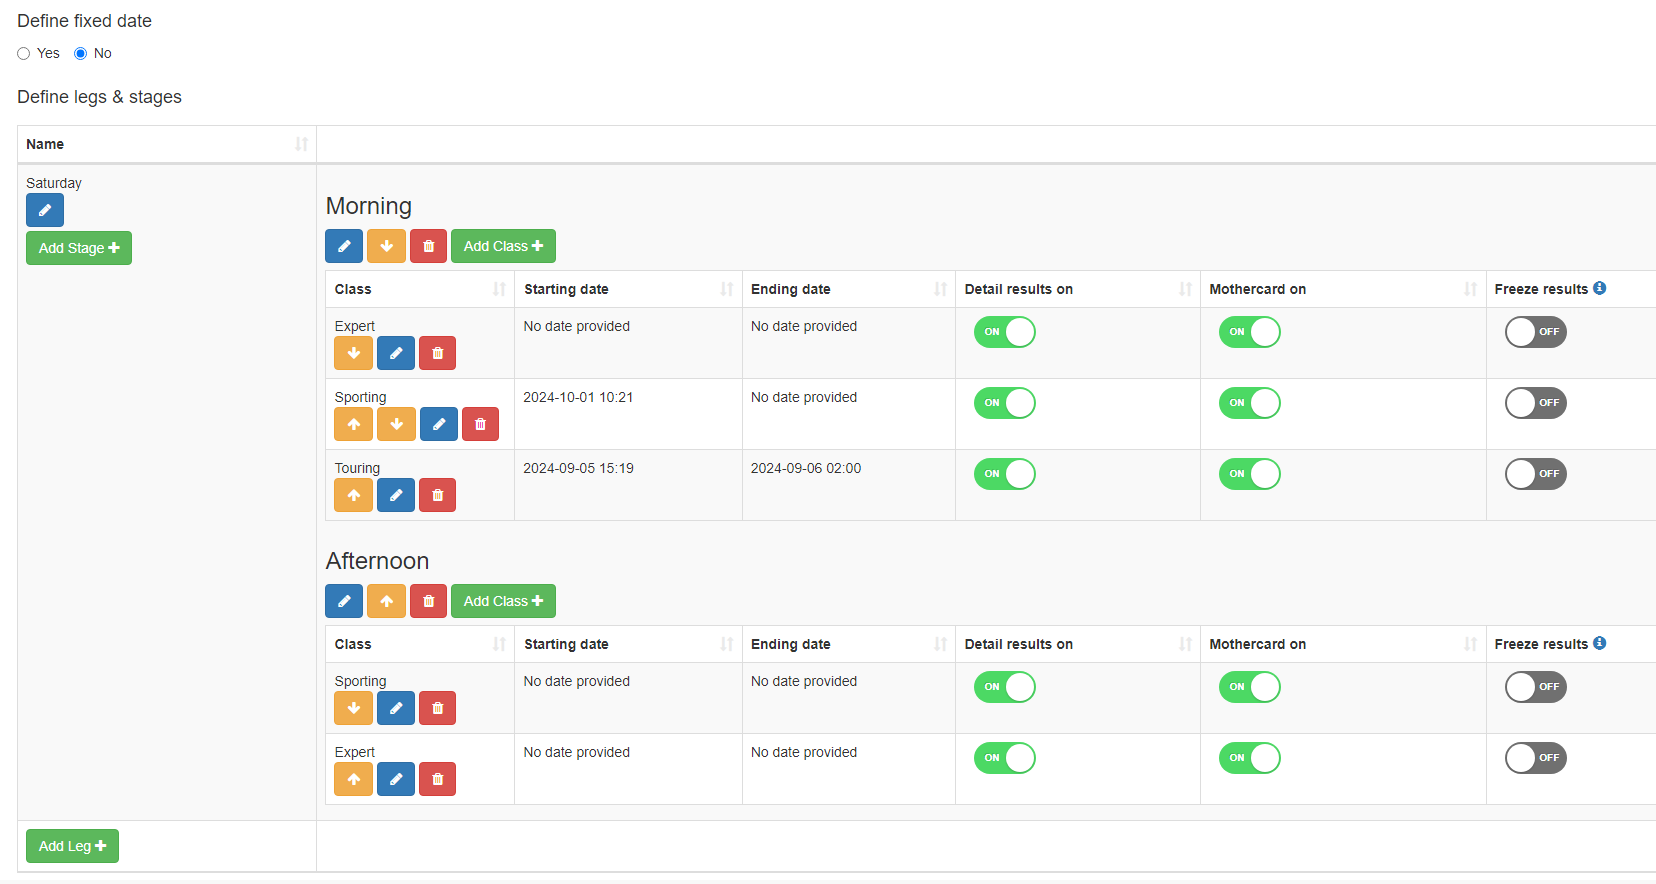
This Rally is on a Saturday and Sunday, in this image only Saturday is shown. You can see the following information:
- The start and finish date and time of the rally. The rally can only be selected in the Rallycheck app during this timeframe.
- The Leg named Saturday
- The Stage named Morning with:
- All three Classes defined for the morning stage. Each class has a Starting date time defined. This is the Base date and time time that is used for calculation of starting times of participants.
- Only two Classes defined for the Afternoon Stage.
When configuring your rally you can decide exactly how you want it designed with regard to Legs and Stages.
Detailed results on
This option enables participants of the selected stage/calss to view the detailed results of the stage after they have passed the Finish control.
Mothercard on
This option enables participants of the selected stage/class to vierw the mothercard of the stage after they have passed the Finish control.
Freeze results
This optiuon disables the recalculation function of the results of the selected stage/class.
5.1.6.Edit Route - settings
The “Edit Route – settings” tab is used to select some defaults for the creation and editing of the route.
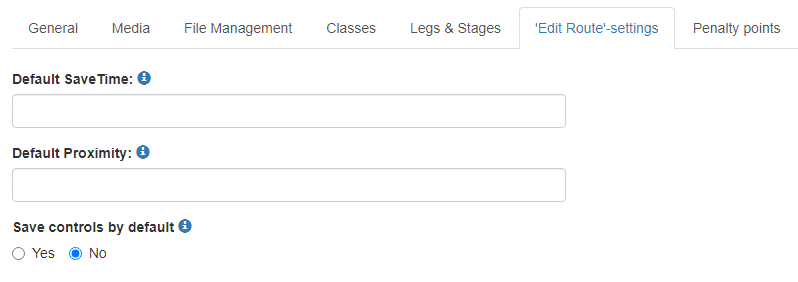
Default save time
The waypoints (controls) added to the route, will have this save time as default SaveTime.
Note: changing this setting will not change the SaveTime of existing waypoints.
The system default SaveTime is 60 seconds.
Default Proximity
The waypoints (controls) added to the route, will have this value (in meters) as default Proximity.
Note: changing this setting will not change the Proximity of existing waypoints.
The system default Proximity is 45 meters.
Save controls by default
When this setting is enabled, the Rallycheck app will automatically accept any control hit by the participant. The participant can still cancel the hit, but if they do nothing, the hit will be accepted.
5.1.7.Penalty points settings
On this tab you can define the penalty points for your rally.

The penalty points are explained as follows.
Route controls
Missed controls. This is the number of penalty points received if you have missed a passage control or have saved a “false” control.
Default value: 100 points per control.
Regularities
Too early. This is the number of penalty points received when encountering a time control before the Norm Regularity Time (NRT).
default value: 1 point per second.
Too late. This is the number of penalty points received when encountering a time control after the Norm Regularity Time (NRT).
default value: 1 point per second.
Maximum. This is the maximum number of penalty points received per regularity.
Lap Consistency test
Too early. This is the number of penalty points received when reaching a LC control before the expected time.
Too late. This is the number of penalty points received when reaching a LC control after the expected time.
Maximum. This is the maximum number of penalty points received per LC test.
Speed test bogey time
Too early. This is the number of penalty points received when finishing a Speed test before the Bogey time (usually 0).
Too late. This is the number of penalty points received when finishing a Speed test after the Bogey time.
Extra. This is the number of penalty points received when making an error on the speed test circuit. This value must be entered by a marshal.
Maximum. This is the maximum number of penalty points received per Speed test.
Time Controls
Too early. This is the number of penalty points received when encountering a time control before the Norm Passage Time (NPT).
default value: 10 points per minute.
Too late. This is the number of penalty points received when encountering a time control after the Norm Passage Time (NPT).
default value: 10 points per minute.
Maximum. This is the maximum number of penalty points received per missed Time Control.
Maximum minutes before IPT. This is the maximum number of minutes before the IPT that a participant can register a Time Control. If a Time Control is hit before this time, maximum penalty will be awarded for the Time Control.
Penalty free early for TC-IN. This is the number of minutes a participant can check in early per TC-IN without receiving a penalty. This is usually user to regroup the field and not have participants waiting for their IPT before a lunch or Finish location.
default value: 15 minutes early without penalty.
Penalty free early for TC-FINISH. This is the number of minutes a participant can check in early per TC-FINISH without receiving a penalty. This is usually user to regroup the field and not have participants waiting for their IPT before a lunch or Finish location.
default value: 15 minutes early without penalty.
Penalty free lateness per TC-START. This is the number of minutes a participant can check in late at a regular TC without receiving a penalty.
default value: 0 minutes late without penalty
Penalty free lateness per TC. This is the number of minutes a participant can check in late at a regular TC without receiving a penalty.
default value: 0 minutes late without penalty
Penalty free lateness per TC-IN. This is the number of minutes a participant can check in late at a TC-IN without receiving a penalty.
default value: 0 minutes late without penalty
Penalty free lateness per TC-FINISH. This is the number of minutes a participant can check in late at a TC-FINISH without receiving a penalty.
default value: 0 minutes late without penalty
Disable Penalty free lateness. It is possible to disable penalty free lateness for selected classes.
Making up lost time
This can be set if participants are allowed to make up lost time when checking into a TC.
TC. The number of minutes a participant can make up per TC without receiving a penalty, if “making up lost time” is set.
default value: 10 minutes per TC.
Allow unlimited UIPT-adjustment when making up lost time. This setting can only be enable by the system admin.
Speed check penalties
This shows the calculation used by Rallycheck when computing speed penalties. Rallycheck currently supports two types of Speed penalties. The calculation of the penalties is shown on the screen.
Exact Speed Controls
This shows the penalty for an Exact Speed Control. Any deviation in the norm speed results in a base penalty per km/h. There is also a maximum penalty setting for this control.
5.1.8.Results Calculation
With these options you can select the type of results calculation for your rally.
The selection of the results calculation is depending on your account privileges. If you cannot edit this field, please let us know and we will set the correct value for you.
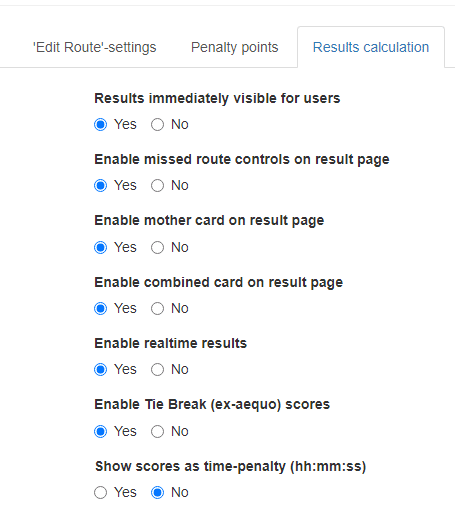
The option “Results immediately visible for users” enables you to enable or disable the participants results of the rally. When set to Yes the participant will see exactly which controls were missed and the number of penalty points received. When set to “No” the participant will not see the results. Only the rally organizer can see the results in the Rallycheck Portal.
The option “Enable missed route controls on results page” displays the controls that the Participant has missed on the road map of the results page.
The option “Enable Mother card on results page” displays the mother card ont the participants results page.
The option “Enable combined card on results page” displays a combination of the participants control card with the Mother card so that the participant can easily see which controls have been missed en what has been handled correctly.
The option “Enable real time results” allows you to see the results of the rally on the fly. Each time a participant passes a Route or Time Control, the results of the rally are updated. A percentage complete is shown per participant enabling the rally organization to see the progress of each participant.
The option “Enable Tie Break (ex-aequo) scores” enables the rally organization to enter scores for a tie break situation as needed.
The option “Show scores as time-penalty (hh:mm:ss)” publishes the penalty points as a time penalty, for example 75 penaly points is translated to 00:01:15 time penalty.
5.1.9.Image Gallery
The Rallycheck image gallery is a set of images which you can upload to the portal. Use these images as route controls.
This is an example oif some images:
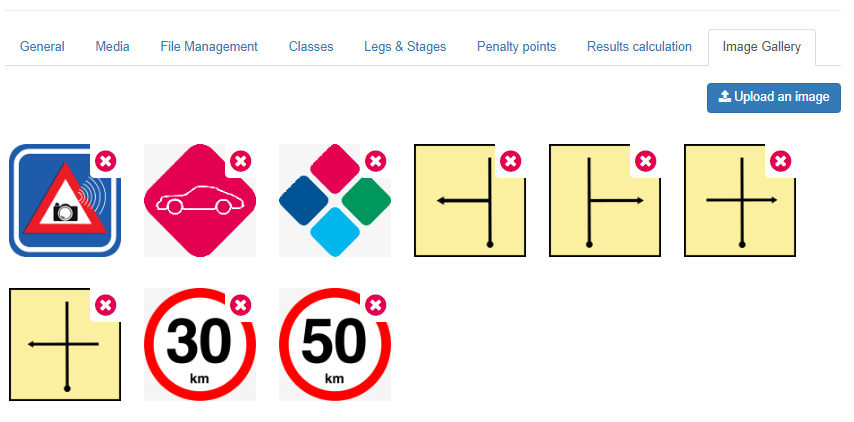
You can upload images per rally. We currently support a resolotion of 125 x 125 px.
You can select images in the “Edit route control options” pop up in the Edit route module. Here is an example of how you can use this on a control card:

5.1.10.Scanner settings
Rallycheck supports a scanner function. With the Rallycheck scanner, marshals can scan an optional participants QR code an log the time of a passage.
By default, the header of the scanner app show “Rallycheck scanner”.
When this option is enabled, the Rallycheck scanner shown a different header “<my rally name> scanner”.
5.2.Edit Route
This is the page where you will define all your route controls.
The page is divided into two sections. On the left side of the screen is the Mother card. On the right side of the screen is the road map.
Mother Route Control Card
The Mother Route Control Card (or Mother Card) is the card where all route controls are listed in the order in which they are encountered when driving the rally.
Road Map
The Road Map shows the position of all the controls on the map. Controls can be positioned on the Road Map by clicking on the exact position for the control on the road map.
The difference between the Road Map and the Mother Card
There is a big difference between the Road Map and the Mother Card. On the Road Map all controls are listed only once! On the Mother Card a control can be listed multiple times. For example, when driving the rally, it is possible to pass a control, lets say control B, and saving it in the Rallycheck app. Later, you could, depending on the route, pass B again and save this in the Rallycheck app.
The B is of course the same actual control on the map and has the same GPS position. The control B will however be listed twice on the Mother Card.
It is very important to have a good understanding of the subtle difference between the Road Map and the Mother Card. This is important as some attributes of a route control are linked to it’s GPS position, and some attributes are linked to it’s Mother Card instance.
Buttons
There are a number of buttons at the top of the page. The function of these buttons are explained below.
Use Old Edit Route
This is a link to an older, deprecated, version of Edit Route. This button will be removed in 2025.
Getting started
A short introduction in using the Edit Route page.
Download GPX
This option can be used to download the waypoints to a file. You can select the Leg, Stage and Class to download. The GPX download, downloads the waypoints, not the Mother Card.
Upload GPX
This option can be used if you ave all the Waypoints for the controls in another map program. You can export the information from your other map system to GPX format. Then upload the GPX file to the Rallycheck portal.
Print Mother Card
With this function you can print the Mother Card or export it as a PDF document. There are a number of settings for printing the mother Card.
Delete Mothercard
With this button you can delete the entire Mother Card of the stage.
Restrict controls to specific times
When this option is used, controls for this stage/class combination will only be available in the specified time frame.
Show shortest route
When this option is enabled, you will see the shortest route displayed visually on the road map.
Enter a location
You can enter a location (address) in this field to quicly go to a spot on the roadmap.
5.2.1.Route Control Options
When creating or updating a Control you will see the following pop-up screen:
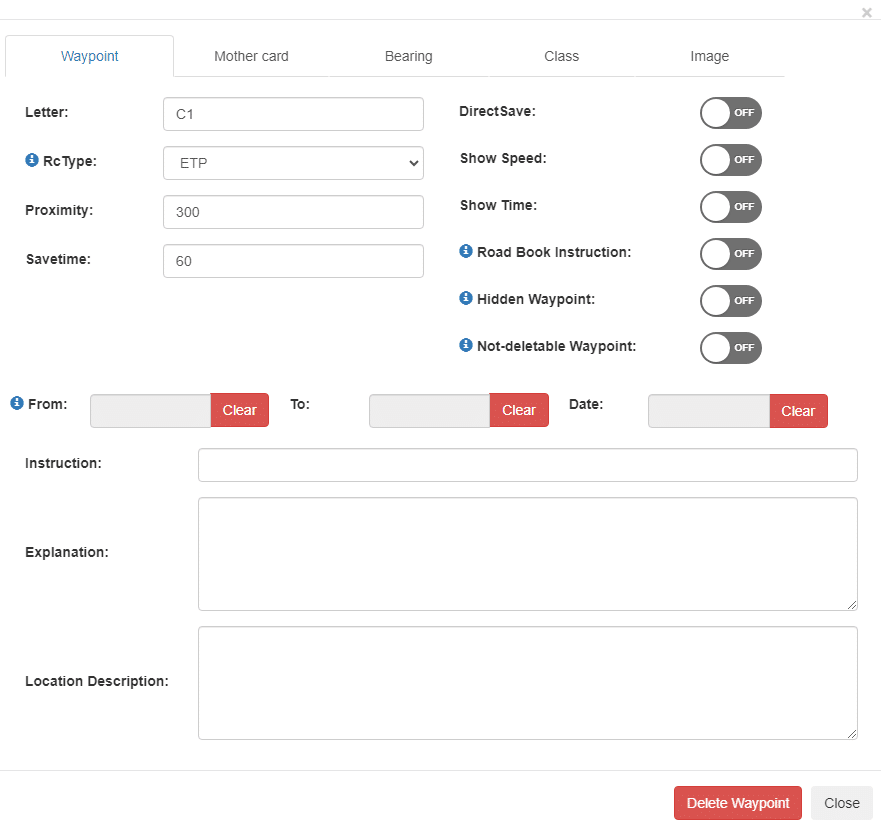
Route Control Options
The Route Control Options screen consists of five tabs. The first tab is the “Way point”. The second tab is the “Mother card” and the third tab is the “Bearing”. Tab four is “Class” and tab five is “Image”.
The Way point settings refers to settings of the way point on the road map. The information entered here will be the same each time a participant passes the Control during the rally.
The Mother card settings refers to the Control on the mother card. This information is separate to the actual waypoint. This information is not used in the Rallycheck app. This information can be used when calculating results. If the mother card has the same control more than once, it is possible to manage these settings per instance on the mother card.
The Bearing settings refer to the way point on the road map. The information entered here will be the same each time a participant passes the Control during the rally.
The Route control options are described below.
5.2.1.1.Letter
The Letter field can be used to enter the letter of the control. This is usually 1 character long. It is possible to enter more than one character. The Letter field will be scaled down to 8 characters in the Rallycheck app if it is too long. This may make it difficult to read on some phones if it is too long.
Best Practice:
We advise organizers to keep this field as short as possible! No more than 3 or 4 characters. The maximum is set to 8 characters.
Here are some examples:
A: normal passage control
T1: time control 1
or
TC1: time control 1
5.2.1.2.RcType
There are 17 RcTypes. They are listed below.
START
The Start control of the rally. When this control is encountered is acts as the start of a new stage of the rally.
TC-START
The Start control of a rally when Participants are started at a pre scheduled time. The TC-START is visible in the Rallycheck app a default 3 minutes prior to the scheduled start time. The TC-START control is visible in the app for a default 60 minutes after the scheduled starting time.
RC
A standard passage control.
TC
A Time control. The Time control shows the running time on the screen of the Rallycheck app. The competitor can decide at what time is saves the control by clicking save.
TC-IN
A Time control with the option to check in early. The Time control shows the running time on the screen of the Rallycheck app. The competitor can decide at what time is saves the control by clicking save. With this type of TC it is usually allowed to check in early without penalty. The amount of time that a participant can check in early without penalty, is configured per rally. TC-IN does not act as a Finish of the stage.
TC-FINISH
A Time control combined with the Finish of a stage of the rally. Time control shows the running time on the screen of the Rallycheck app. The competitor can decide at what time is saves the control and Finishes the stage by clicking save. With this TC it is usually allowed to check in early without penalty. The amount of time that a participant can check in early without penalty, is configured per rally. TC-FINISH acts as a Finish of the stage.
FINISH
The Finish control of a stage of the rally. The Finish control stays on screen in the Rallycheck app and the participants must click on the save button to Finish the stage.
ETP
An ‘Exact Timing Point’. Hits on this control will be timed based on when the competitor was closest to the center of the control.
LC
A “Lap Consistency” control. This control is used when running a lap consistency test on a, usually closed off, route. One LC on the road map in combination with a minimum of three LC controls on the control card are needed for a lap consistency test.
TC-MARSHAL
A Time Control (TC) which is manned by marshals. The participant drives the car to the marshal location. The marshal registerd the passage time. The time noted by the marshal is the time used for calculating results.
HTC-MARSHAL
A Hidden Time Control (TC) which is manned by marshals. The participant drives the car to the marshal location. The marshal registerd the passage time. The time noted by the marshal is the time used for calculating results. HTC-Marshal controls are registered per second.
SC-MARSHAL
A Speed Control (SC) which is manned by marshals. The participant drives the car to the marshal location. The marshal has registerd the passage speed. The speed noted by the marshal is the speed used for calculating results.
TC-IN-M
A Time Control IN (TC-IN) which is manned by marshals. The participant drives the car to the marshal location. The marshal registerd the passage time. The time noted by the marshal is the time used for calculating results.
TC-FINISH-M
A Time Control FINISH (TC-FINISH) which is manned by marshals. The participant drives the car to the marshal location. The marshal registerd the passage time. The time noted by the marshal is the time used for calculating results.
RC-MARSHAL
A Route Control (RC) which is manned by a Marshal. This control is never visible in the Rallycheck app. It is designed for marshal used at test or speed stages. Penalty points can be awarded to participants that (for example) drive the wrong route, miss a “Stop astride”, hit a cone, etc.
QZ-ENTRY
A Quiet Zone entry point. After hitting this control, participants will receive a persistent speed warning urging them to stay under the given speed limit.
QZ-EXIT
A Quiet Zone exit point. Effects of any quiet zone will be cleared for any participants hitting this control.
Best Practice:
A rally stage must have one, and only one, START or TC-START control. This is the first control of a stage.
A rally stage must have one, and only one, FINISH or TC-FINISH control. This is the last control of a stage.
5.2.1.3.Proximity
The Proximity is a value in meters and is set to a default of 45. It describes the geofencing radius around a route control.
When a participant is with the proximity of the control, the Rallycheck app will detect the control and, inost cases, show the control on the screen.
Best Practice:
Try to use the default value.
Stay away from low proximity values. Values smaller than 20 meters are not advised.
5.2.1.4.Savetime
With the Savetime options you can manage the time, in seconds, that the control is visible on the Rallycheck screen.
The default value is usually 60 seconds.
The default value for controls also using the AutoSave option is 15 seconds.
Best Practice:
Try to keep the value constant for the whole rally. We have experimented a lot with this value and 60 seconds seems to work well. This value, in combination with the 15 seconds value when using AutoSave is advised.
5.2.1.5.DirectSave
When the DirectSave option is set to ON, the Rallycheck app will always save the RC or START control in the app. The participant does not have the choice to save or cancel the control. When set to ON, de Savetime is automatically defaulted to 15 seconds. The Savetime can be changed.
DirectSave does not have impact on the TC or FINISH controls. These controls must always be saved by the participant.
The default value is OFF.
Best Practice:
Use this option for speed controls or “hidden” time controls.
5.2.1.6.ShowSpeed
The ShowSpeed option is an informational feature. When this option is set, the Rallycheck app will show the speed of the participant when it reaches the control. The speed is shown on the screen with control, but also on the screen with all the controls. It is also shown on the Route Control Card which the participant receives per email and also on the route Control Card that the rally organization receives.
Best Practice:
Use this option in conjunction with DirectSave for speed controls.
5.2.1.7.ShowTime
The ShowTime option is an informational feature. When this option is set, the Rallycheck app will show the time of the participant when it reaches the RC, TC, START or FINISH control. The time is shown on the screen with the control, but also on the screen with all the controls. It is also shown on the Route Control Card which the participant receives per email and also on the Route Control Card that the rally organization receives.
For a TC control, the ShowTime option will show the time at which the participant saved the TC.
Best Practice:
Use this option in conjunction with a TC to show the time a which the participant has checked in a the TC.
Use this option for “hidden” or “secret” time controls during the rally or during a regularity section of the rally.
5.2.1.8.Raod Book instruction
A Road Book instruction wil lbe shown to the Participants in the Rallycheck app when they reach the location, but it will not be part of any results calculations.
5.2.1.10.Not-deletable Waypoint
A Not-deletable Waypoint can be accepted, canceled and ignored as usual.
However, once it has been accepted, Participants will not be able to delete the waypoint or any waypoints before it.
5.2.1.11.From - To - Date
The From To option in combination with an optional date enables organizations to specify the times when a control will be active.

In this example the control is visible from 9 am to noon. The control is visible during that time period on every day. In order to specify a specific date, enter the Date Field. The control will only be visible from 9 to 12 on that specific date. This function can be usefull when the route driven in different rally stages overlap.
If the time in the From field is later than the To field, the control will be visible from one day to the next. To allow this specific situation to work properly, the Date field should be left empty. This specific situation can be usefull during night stages.
5.2.1.12.Instruction
The Instruction field can be used to show participants a (short) instruction when reaching the control. This can be any information and is free text.
Best Practice:
Keep this informational field as short as possible. Remember that the participants will read this text on the phone and that the information is scaled to fit one line of the phone. Not all participants have large phones! The smaller the phone the smaller the text and the more difficult to read.
5.2.1.13.Explanation
This free format text field can be used to describe the situation of the control in the rally. It is only used in the results module when a participant has missed a control (or has saved a false control). With the explanation, a participant is able to understand the situation and the organizer has an opportunity to inform the participant of the route that should have been taken.
5.2.1.14.Location Description
The location desription is a free format text field in which the location of a waypoint can be derscribed.
This discription will be used when creating Timing Control sheets. On the Timing sheet, the location description will be shown next to the name of the (Time) Control.
5.2.1.15.Norm Passage Time
The Norm Passage Time is located on the “Mother card” tab.
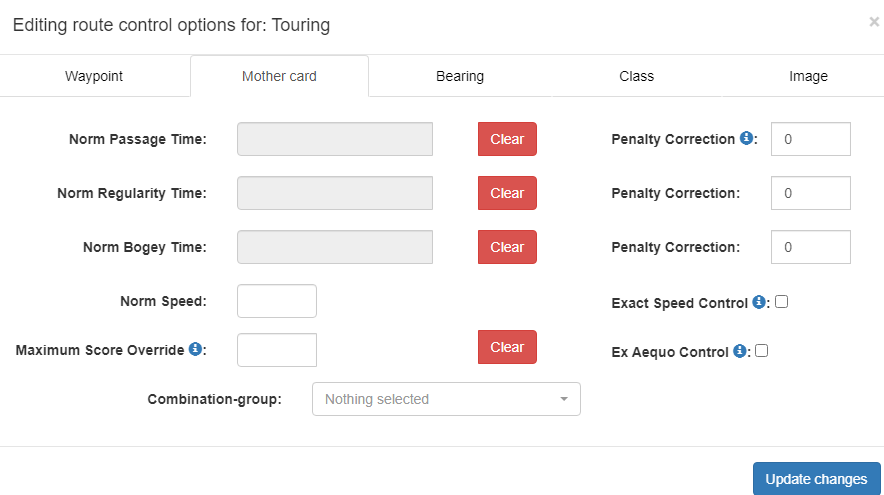
The Norm Passage Time (NPT) is used to define the passage time of controls. It is usually the time at which the first competitor should pass a time control (TC).
The time could (for example) be 8:01, and defines the start time of the first participants.
It has no function in the app. The Rallycheck app does not know the norm times for the participants. It is the responsibility of the participants to arrive at a TC at the correct time.
The NPT can be used for computing a time penalty in the results module.
NPT Penalty Correction
The maximum amount of penalty points which will be deducted from the incurred time penalty. This amount can be used by the organization to neutralize an extreme time penalty for all the Participants of the rally (in this class and stage).
5.2.1.16.Norm Regularity Time
The Norm Regularity Time (NRT) is used to define the passage time of controls during a regularity. It is usually the time at which the first competitor should pass a hidden time control (GTC).
Best Practice:
This is a short example of a possible use of the NRT.
At the start of the regularity
Letter: R
DirectSave: ON
ShowTime: ON
Instruction: Start REG
NRT: 0:00
The first time control in the regularity:
Letter: G
DirectSave: ON
ShowTime: ON
Instruction: GTC
NRT: 7:15
The Norm Regularity Time at the first time control in a regularity should be 7 minutes and 15 seconds.
Using DirectSave and ShowTime ensures that a participant’s time is registered automatically and the the registered time is visible on screen.
The results calculation module is responsible for determining a time penalty using the times at control R, G and the corresponding NRT times.
In this example the start of the regularity timing is a “rolling start”.
NRT Penalty Correction
The maximum amount of penalty points which will be deducted from the incurred time penalty. This amount can be used by the organization to neutralize an extreme time penalty for all the Participants of the rally (in this class and stage).
5.2.1.17.Norm Bogey Time
The Norm Bogey Time (NBT) defines the bogey time on a (speed) test.
Best Practice:
There should be at least two controls with the NBT set.
The first control is set to the time 0:00:00, and represents the start of the test.
The second control has the NBT set to the bogey time of the test.
Bogey Penalty Correction
The maximum amount of penalty points which will be deducted from the incurred time penalty. This amount can be used by the organization to neutralize an extreme time penalty for all the Participants of the rally (in this class and stage).
5.2.1.18.Norm Speed
The Norm Speed (NS) is used to define the norm or maximum speed at a control. It is usually set to the value of the maximum allowed speed and is used for speed controls.
The Norm Speed could (for example) be 35, and defines the (maximum) speed that the participant should not exceed. The value can be used for Kilometers or Miles. At this time, Rallycheck only supports Kilometers.
It has no function in the app. The Rallycheck app does not know the Norm Speed for the participants. It is the responsibility of the participants to avoid speeding!
By default participants will only be penalized for exceeding the norm speed. The norm speed has the option to set an Exact Speed Control, when this checkbox is checked, participants will be penalized for any deviation of the norm speed, including passages that are either to fast or too slow.
Exact Speed Control
By default, participants will only be penalized for exceeding the norm speed.
If this checkbox is checked, participants will be penalized for any deviation from the norm speed, including passages that are either too fast or too slow.
Best Practice:
The Norm Speed can be used With DirectSave and ShowSpeed.
Using this combination of options enables the organization of a rally to check the speed of a participant at a certain control. Optionally the results calculation module can award penalty points if a competitor is caught speeding.
5.2.1.19.Maximum Score Override
Setting a Maximum Score Override value will make so that value is used instead of the rally-wide setting for this control type.
5.2.1.20.Ex Aequo Control
The Ex Aequo Control or Tie Break Control setting is used in order to allocate the Time Penalty of a control to be used for Tie-Break situations. The penalty points of this control will not be used in the normal calculation of the results of the competitor.
The Ex Aequo scores are used as a tie breaker when regular scores are equal.
5.2.1.21.Combination-group
A combination-group is a predefined group of multiple combinations which is calculated as a maximum of one penalty.
A combination of controls can be defined in the rally. Missing one or more of the controls in a combination only results in one penalty. This is used so as not to overly penalize a participant that has made only one error, when this single error results in missing multiple controls.
A combination-group further extends the possibility to limit the penalty points over multiple, grouped combinations.
Best Practice. This is an advanced function which should be used only in the case that you know exactly what the impact is for the results of the rally.
5.2.1.22.Bearing
The driving direction for a control can be set on the “Bearing” tab.

Set Bearing to the ON position to enable it’s use.
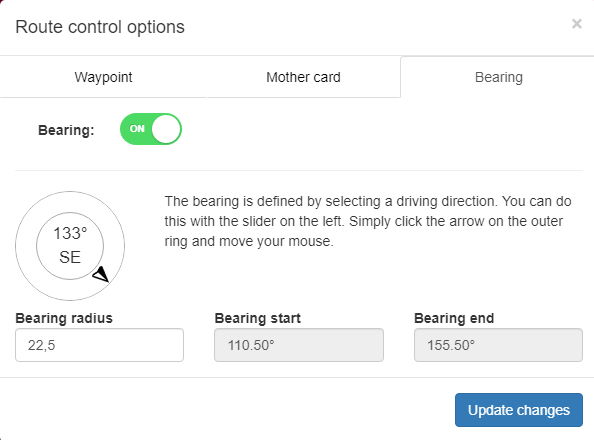
The Bearing represents the driving direction in which the control can be detected. When driving to the control from another direction, the control is not shown in the Rallycheck app. You can set the driving direction bij clicking the arrow on the outer ring an moving it around.
Bearing radius
The bearing radius is set to 22,5 degrees left and right. This is the correct default value. If at all possible, leave it at the default value. With this value a participant can deviate up to 22,5 degrees with regards to the defined angle (driving direction) when encountering a control. The defined range for detecting the control is shown between “Bearing start” and “Bearing end”. It is important not to make the value of the bearing radius too low.
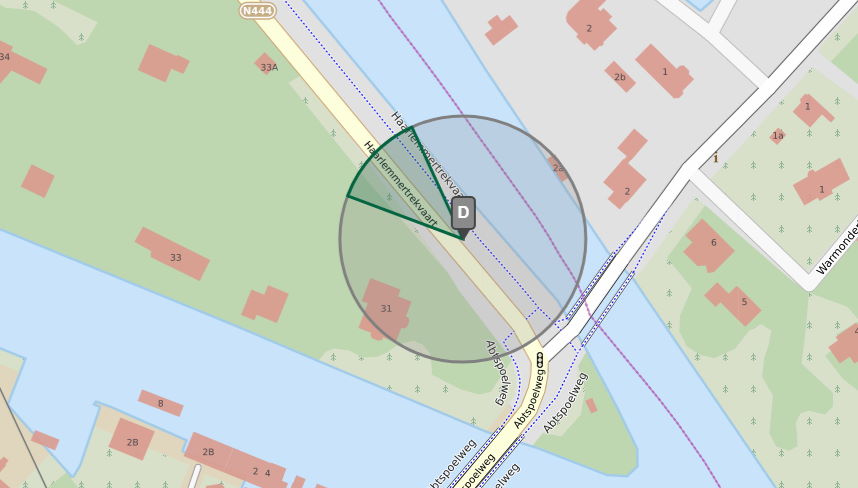
In the following image the Way point on the road map is shown. The driving direction is 133 degrees, and the “green” highlight in the way point proximity is the direction from which the control can be detected.
5.2.1.23.Classes
Each control can be added to one or more classes.
Overview classes
5.2.1.24.Image
Use this tab to add an image to a route control.
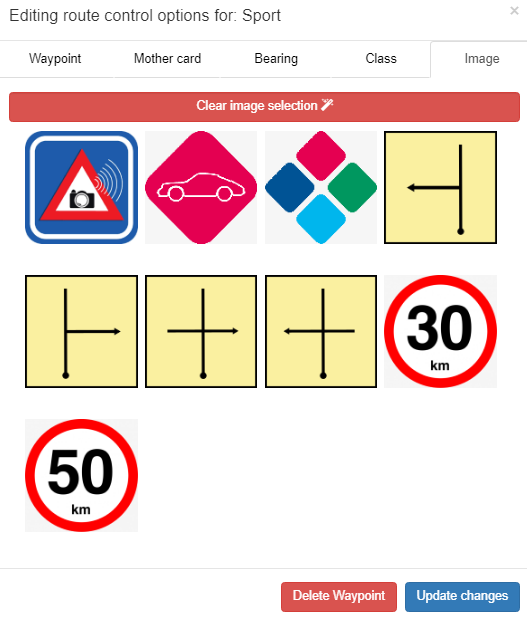
Select the image by clicking on the image.
If you want to remove an image from a control, click “clear image selection”.
5.2.1.25.Score-options
The Score-options tab is visible for RC-MARSHAL controls.
At a RC-MARSHAL location, the marshal can award participants penalty points for various different errors on the course. Rallycheck has a default list of possible errors.
The following defaults are preset (but can of course be changed)
- Early start
- Missing one or more cones
- Incorrect route
- No full stop astride
- No attemppted stop astride
- Wrong test
- reversed during test
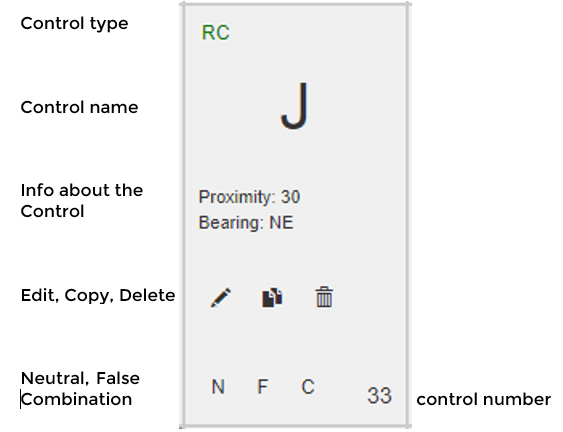
5.2.2.Route Control
A route control is shown on the Roadmap and on the Mothercard.
The following information is shown on the mothercard.
5.2.3.Upload GPX
This option can be used if you ave all the Waypoints for the controls in another map program. You can export the information from your other map system to GPX format. Then upload the GPX file to the Rallycheck portal. All the controls will be shown on the map.
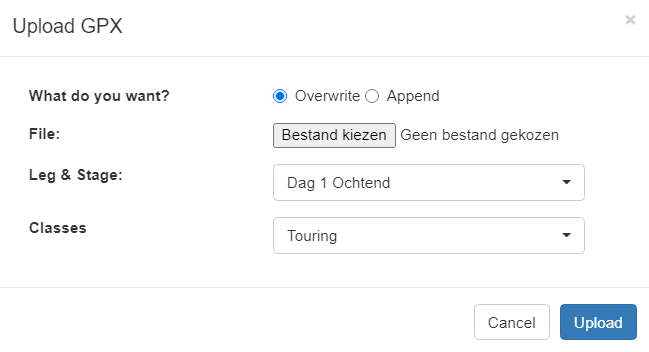
When uploading you can chose to append or overwrite existing waypoints.
You can also choose which Leg, Stage and Class should be updated.
Note: If your rally has Participants that have finished a Stage, then the GPX upload will NOT update waypoints. This is by design.
Rallycheck protects you from accidentally deleting waypoints and controls that may already be used in a stage.
Best practice: For a list of options in the GPX file see:
https://rallycheck.com/gps-to-gpx-definitions/
5.2.4.Download GPX
This option can be used to download all Waypoints and Mothercard information to our GPX format.
This is usefull if you want to save your stage information, or if you want to copy that information to another leg/stage/class or another rally.
5.2.5.Print Mothercard
The Print Mothercard function enables an organizer to print the Mothercard information to a printer of PDF etc.
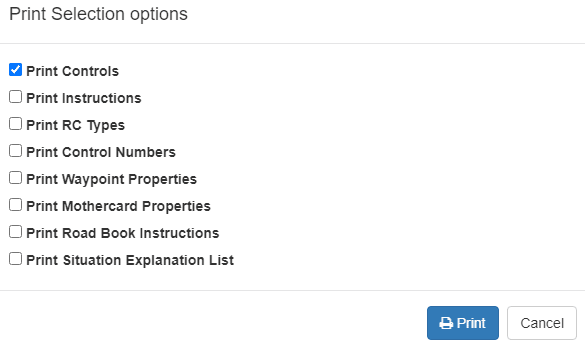
There are a number of options which can beselected when printing a Mothercard.
5.2.6.Restrict controls to specific times
This option enables controls to be time specific.
![]()
When check the input options are as follows:

From: this is the starting time for all controls of the stage/class. Before this time, controls wil not be hit.
To: this is the end time for all controls of the stage/class. After this time controls will not be hit.
So the controls are only valid in between the Form and To time.
An organizer can chose to add a date.
When a Date is specified, controls will only be valid on that date and between the From and To times.
5.2.7.Show Shortest Route
When this option is selected, the shortest rouote from waypoint to waypoint is shown visually on the Roadmap. The shortest route is the blue line.
The sequence of the controls is determined by the Mothercard.
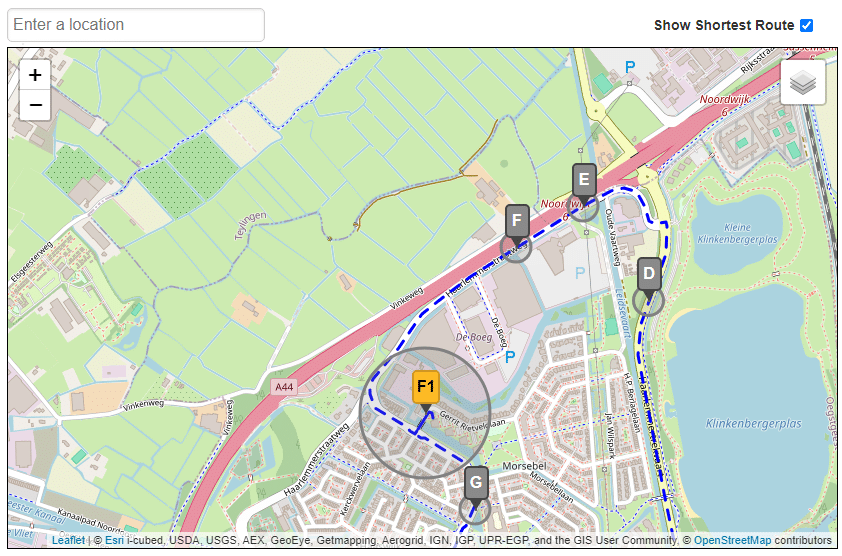
5.2.8.Enter a location
You can search the Roadmap database for a location by just typing an address.
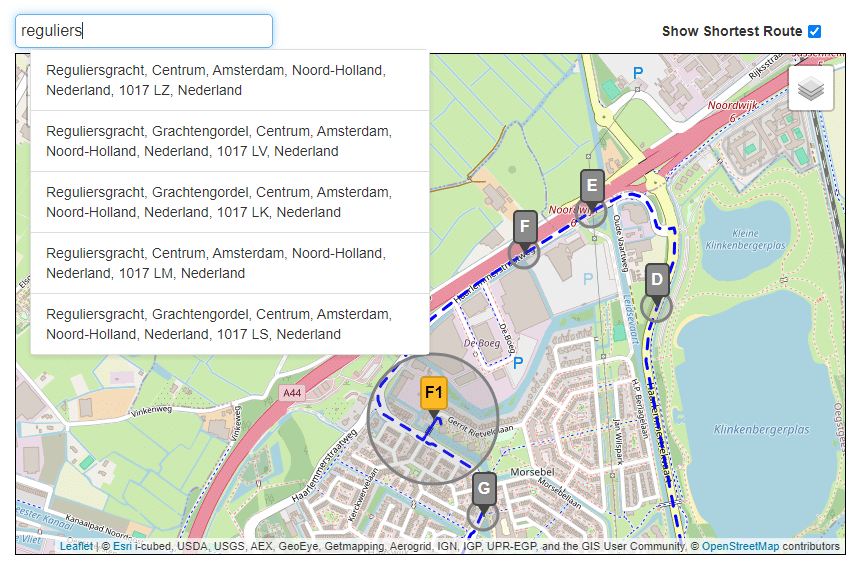
While typing you will be prompted with address sugestions.
5.3.Participants
Within the Participants page, you can manage the participants of a rally.
A participant must have at least the following information:
- A rally class
- A valid Rallycheck email account
- Surname of the driver
- Surname of the navigator
There are a number of options on the participants page. They are listed below.

You can Upload participants using an Excel sheet. In order to have the correct information in the Excel sheet, use the Download template option. This template has all the correct fields needed and also in the correct sequence.
You can select Add Participant, to add participants individually.
The Download Checklist button, download a checklist that can be used at the start of the rally. This makes it easier for a rally organization to check if all participants are registered correctly and ready to go!
5.3.1.Add or Edit Participant
When adding or editing a participant, the following fields can be entered.
General
Starting no.
Class (required)
Rallycheck email account
course car (yes/no)
Driver
First name
Surname prefix
Surname (required)
E-mail address
Telephone Number
Navigator
First name
Surname prefix
Surname (required)
E-mail address
Telephone number
Car
Manufacturer
Model
Build date
Vehicle registration plate
A course car is a member of the rally organization which checks the route. The course car will not be included in starting lists, results and has a separate cost calculation (usually zero) per started rally.
5.4.Results
The Results page shows and overview of the results of the current rally, per stage.
At the top of the page there are three buttons, Resend all emails, Total Results and Recalculate rally scores.
The Total Results button leads you to the total results of the rally. The Recalculate rally scores button recalculates all the scores of all the participants for all the stages.
The Results information itself is sorted by Starting no. but most columns can be used to sort information. The following information and actions are available.
Starting no.
Participants
Class
Last hit
Begin date
End date
Score
Completion (if real time results are enabled)
Actions:
- See Rally Information
- Resend mail
- Recalculate
- Delete stage
5.4.1.See rally information
This page shows the Rally Information of a participant. The basic layout is as follows:
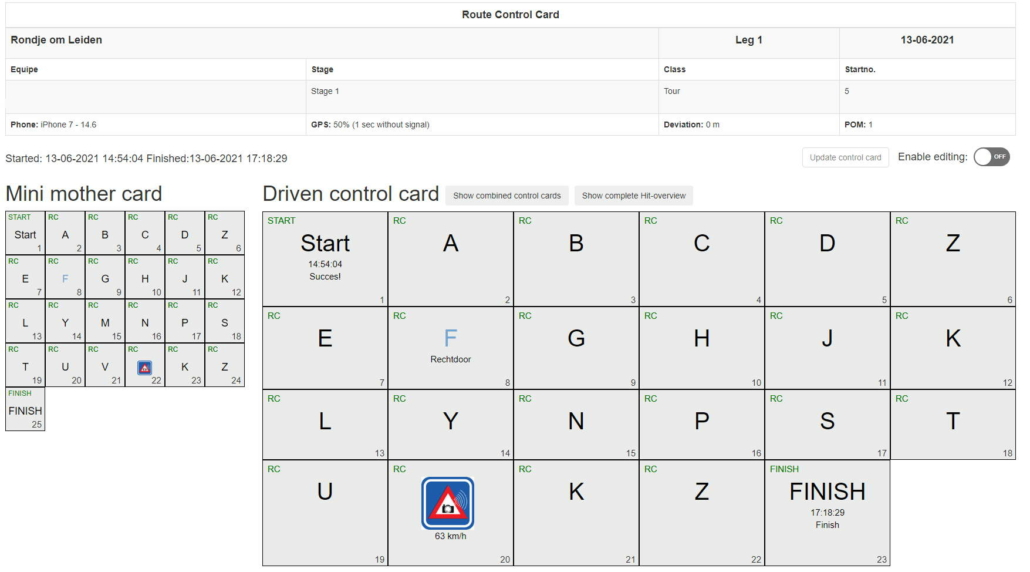
The following information is displayed:
- Rally name
- Leg
- Date
- Participants name and email address
- Stage
- Class
- Starting number
- Phone information
- GPS Information
- Deviation of GPS signal
- POM Points of measurement of GPS
- Starting time of the Stage
- Finish time of the Stage
- The Mother Card of the Stage
- The Participants driven control card
- The results score
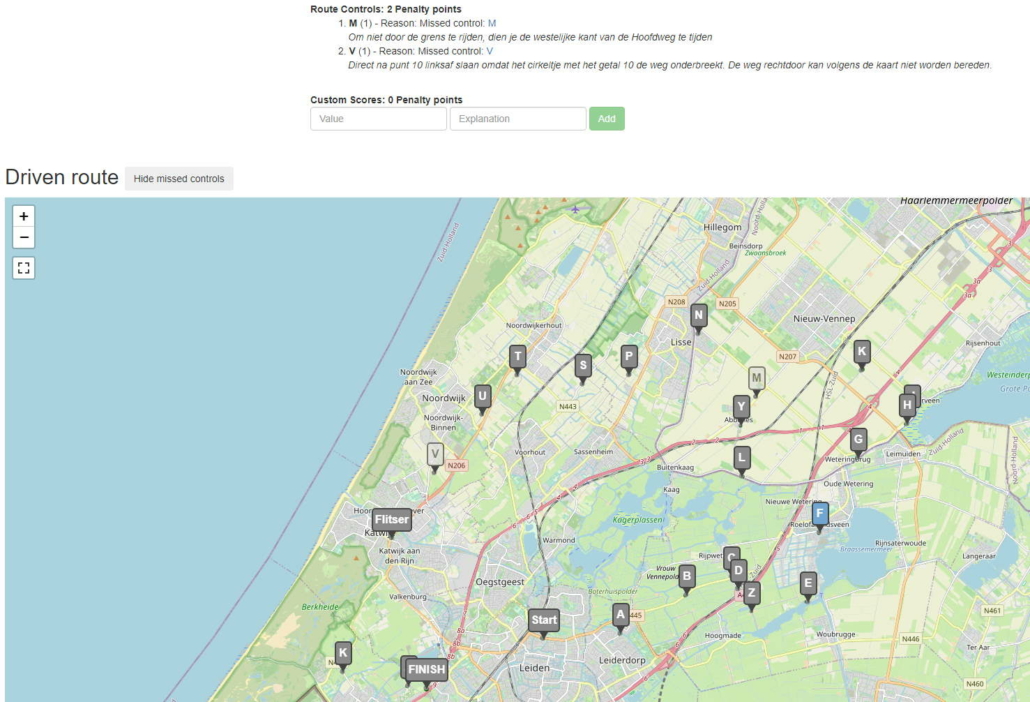
- A list of missed controls and the relevant penalty points
- An input field for custom scores
- An input field for Tie Break score (if applicable)
- A map of the drive route including hit and missed controls
The following options are also available on this page:
- Editing the control card
- Viewing the combined control card
- Viewing the complete list of hits which were displayed on the particpants phone
- Recalculation of results
- Adding custom scores
- Adding tie break scores
- Hiding or viewing missed controls on the road map
5.4.2.Total results
The total results page shows the total results of the rally. The results are shown per Class. All stages results are shown and added to a total result.
Use the Print button to print a result for publication.
5.5.Starting list
This menu option shows the Starting list of the rally. The first time you use this for the rally, no list is visible.
You can create a starting list for each combination of Stage / Leg / Class.
A starting list is created using a base starting date and time. For example, if your base starting time is 9:00, the the first Participant will start at 9:01
The base time you set will also set the starting time for the Leg / Stage / Class combination on the “Legs & Stages” tab of the “Edit Rally” page. Likewise, when editing this field on the Legs & Stages Tab, this will change the Base starting date & time. However, new starting times will only be calculated when clicking on “Generate starting list” button on the “Starting list” page.
The Starting time of a Participant will be used in the following instances.
- When using the TC-START control
- When calculating times relative to the Norm Passage Time of the TC-START or START control or following TC controls.
- When printing a Starting list.
The following Participants will not receive a Starting time:
- course cars
- organizers of a rally
5.6.Apps
The Apps menu enables you to define some extra menu options in the Rallycheck apps.
The followings settings are possible
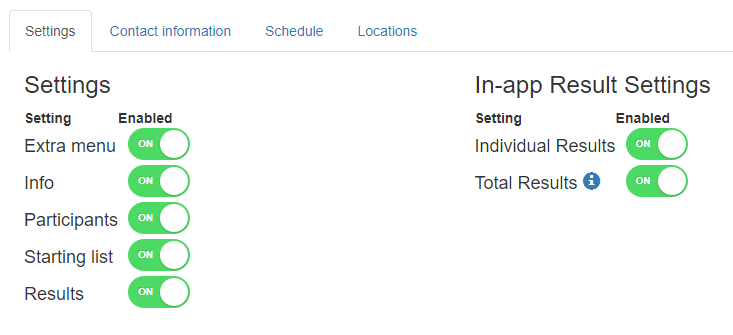
Extra menu
This option enables or disables the entire extra menu from the Rallycheck apps. If this property is set, a menu may be visible in the app. If this option is disabled, no menu will be shown, regardless of other settings.
Info
This option enables you to show information about the rally in your app. The following information is avalable
- Contact information
- Schedules
- Locations
see the relevant paragraphs for an explanation of these three items.
Participants
This option displays the Participant sof the rally in the Rallycheck app. The participants are listed per rally Class.
Starting List
This option displays the starting list in the Rallycheck app. Only the starting list of the Participants own class is displayed.
Results
This option will display results of the rally. In-app results are currently a work in progress. This option will be activated soon.
Enabling all options will show the following menu (encircled in red):
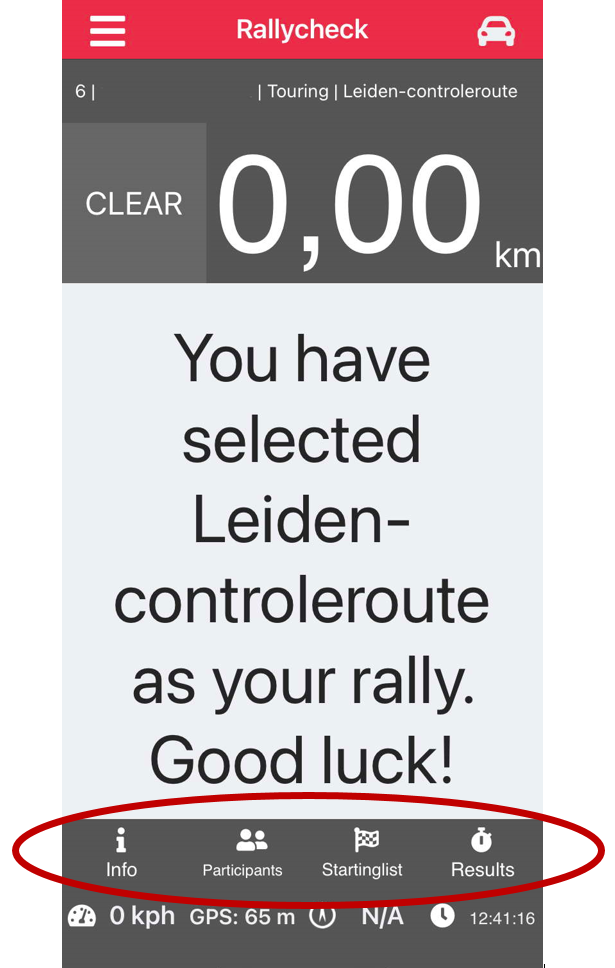
The extra menu is only visible in the portrait orientation of the Android and iPhone app.
This behavior is intentional!
In-App results settings
This options specifies what type of results are shown in the Rallycheck app. You can select Individual results and/or total results.
The individual results are the results of the actual participant during the rally. The participant only sees his or her own results. The results are detailed including the correct and incorrect controls, driven route etc.
The total results can also be shown in the Rallycheck app. This will show the entire results of all competitors of all classes.
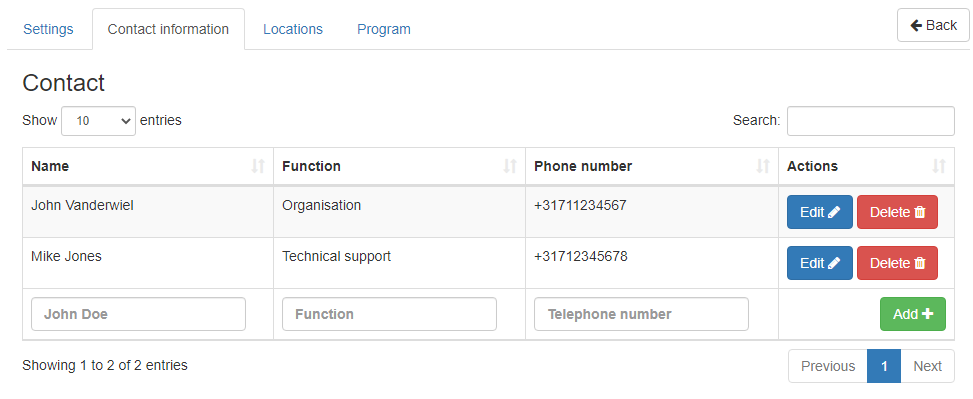
5.6.1.Contact information
Use the contact information page to enter important information that Participants may need during the rally.
5.6.2.Schedule
Use this option to enter the schedule of the rally. This enables Participants to view the schedule from within the Rallycheck app.
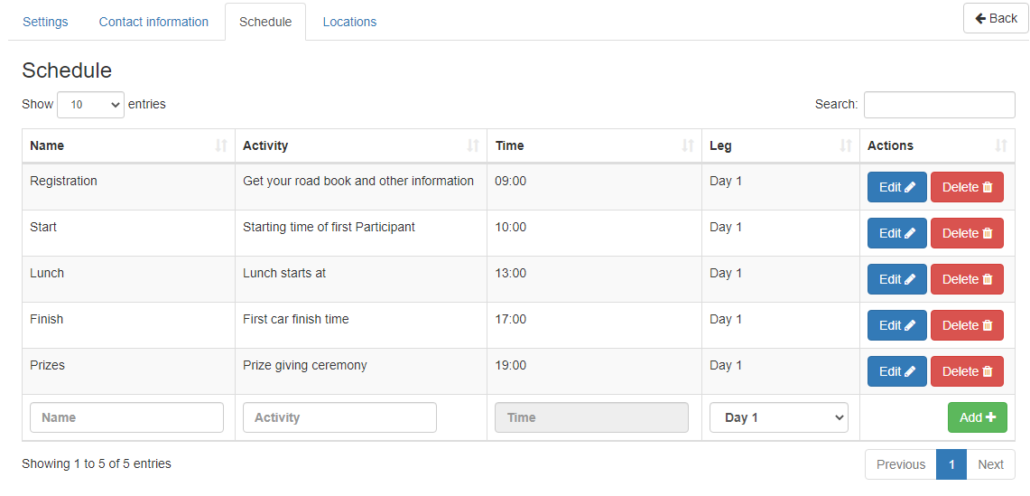
Participants always appreciate a timetable so they know if they are still approximately on schedule.
This is an image of the schedule in the Rallycheck app:
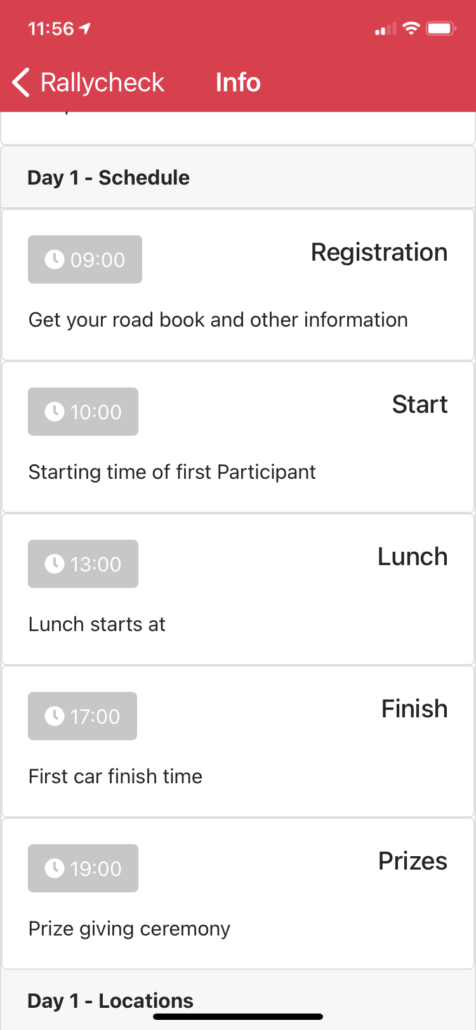
Use of the Schedule function is optional and is for informational purposes only. It has no effect on the actual times of the rally as defined in the “Edit route” section.
5.6.3.Locations
Enter the most important locations of the rally on this page.
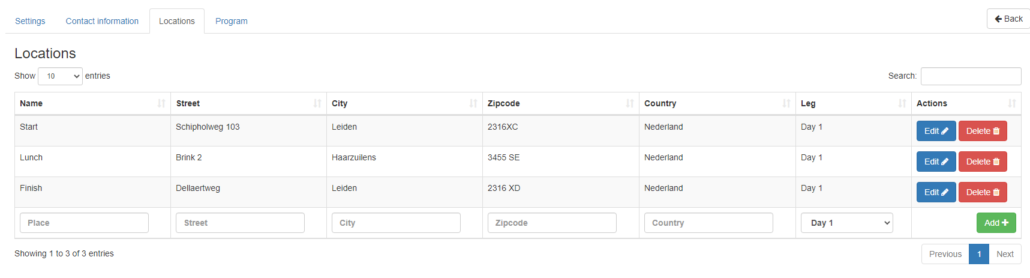
Locations can be assigned to a Leg. This way you can enter the locations of the Start, Finish and other locations that may be necessary for Participants to have on hand.
Use of locations is optional.
5.7.Organizers
With this page you can add Organizers to your rally.
Add an organizer for your rally by entering a valid email account of a person who has the organizer status with Rallycheck. Each organizer of a rally has the same rights to modify the current rally information, route etc. etc.
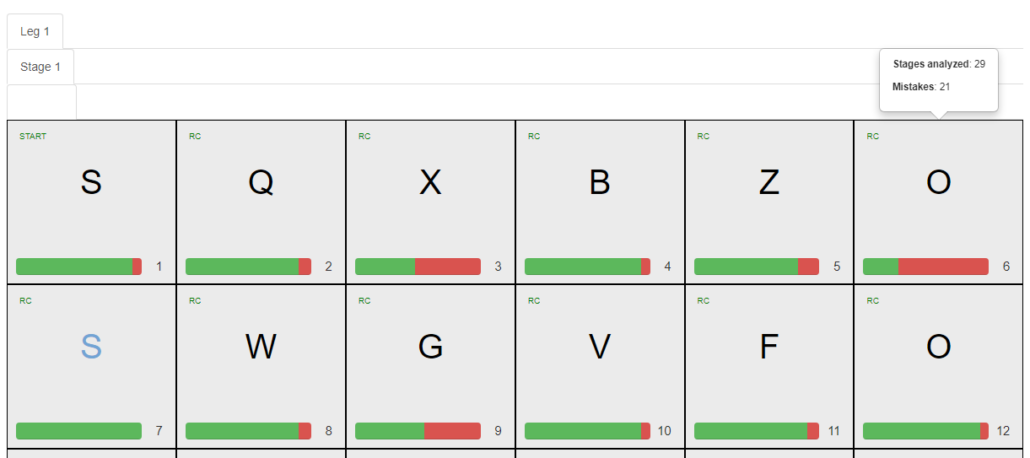
5.8.Route Statistics
The Route Statistics page presents you with an overview of the hit and missed controls. It is a quick overview for the rally organisation to identify which controls are being missed.
In the following overview, you can see that control O is being missed often. In this case, 21 out of 29 analyzed stages.
5.9.Messages
Rallycheck enables you to send messages to participants during the rally.
You can select one or more participants to send a message to.
A message has a Title and Content. The content is limited to 5000 characters.
The process is as follows:
- Click the button “Send a new message”
- Select one or more participants from the list
- Click the button “Send message to selected Participants”
- Enter a Title and Content for the message
- Click “Send message”
Your message will now be delivered tot the selected participants.
When a Participant is driving with the Rallycheck app, their device will fetch any pending messages every 3 minutes.
Messages may not be delivered to Participants that have not yet started of have already finished.
When you have sent a message, you will see an overview of the message you sent on the “Messages” page. The following information is visible:
Title, Content, Posted at time, Number of recipients, Number of successful deliveries.
You can click on the messages live to view details of the sending process. The following information is visible on the details page:
Staring number, Driver/Navigator, Received at time, Status
5.10.Marshals
The Marshal page is set up specifically for sending information to Marshal that will use the Rallycheck Marshal app.
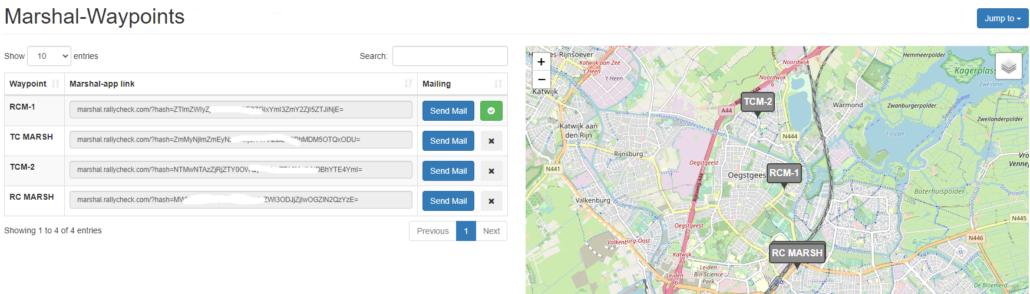
The page shows a list of the Marshal controls (Waypoints) and the option to send the link an message to the Marshal. The page also shows the location of the control on a road map.
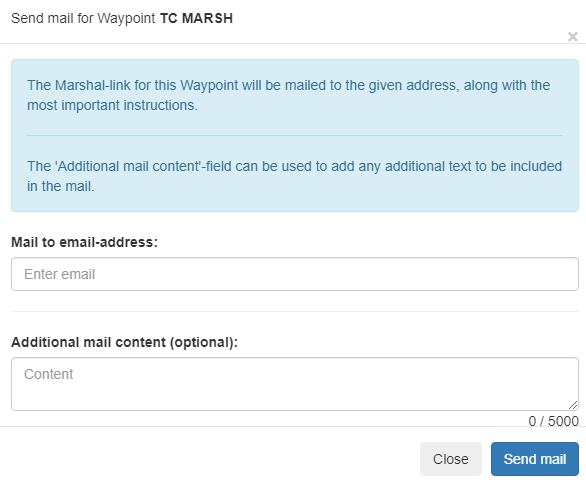
Click the “Send” button to sent the information to a Marshal. You will see a pop-up with information to sent to the marshal.
5.11.Copy rally
With the Copy rally option you can easily copy a rally.
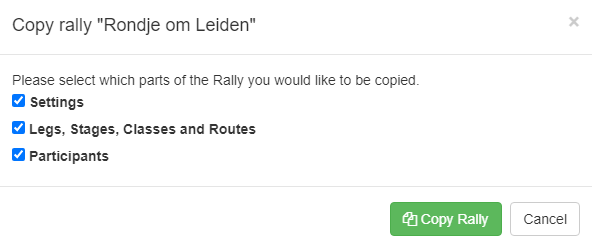
Click the parts of the rally you want to copy and click “Copy Rally”.
5.12.Delete Rally
The delete Rally button enables you to remove the rally from the system. This option is available depending on your privileges.
Please be careful when using this option!
6.Overview menu
The Overview page displays all current (or past) rallies.
There are three options on the Overview page which can be used to filter the results.
Select Rally
With this pull down option you will see all your rallies and you can select the relevant rally you would like to see on the overview.
Select Date
If a rally has been active on multiple dates, use this field to select the relevant date you want to see.
Clear Selection
This clears the selected Rally and Date
Normal use
The main use of this page is to follow all participants during the rally. You will see a road map with all the participants that are active in one (or more) of your rallies. You will see a list of users that have started a rally on the current and previous day. You see the started participants of the previous day just in case your rally Stage extends past midnight.
You see two tabs at the top of the road map, “Map” and “Users”.
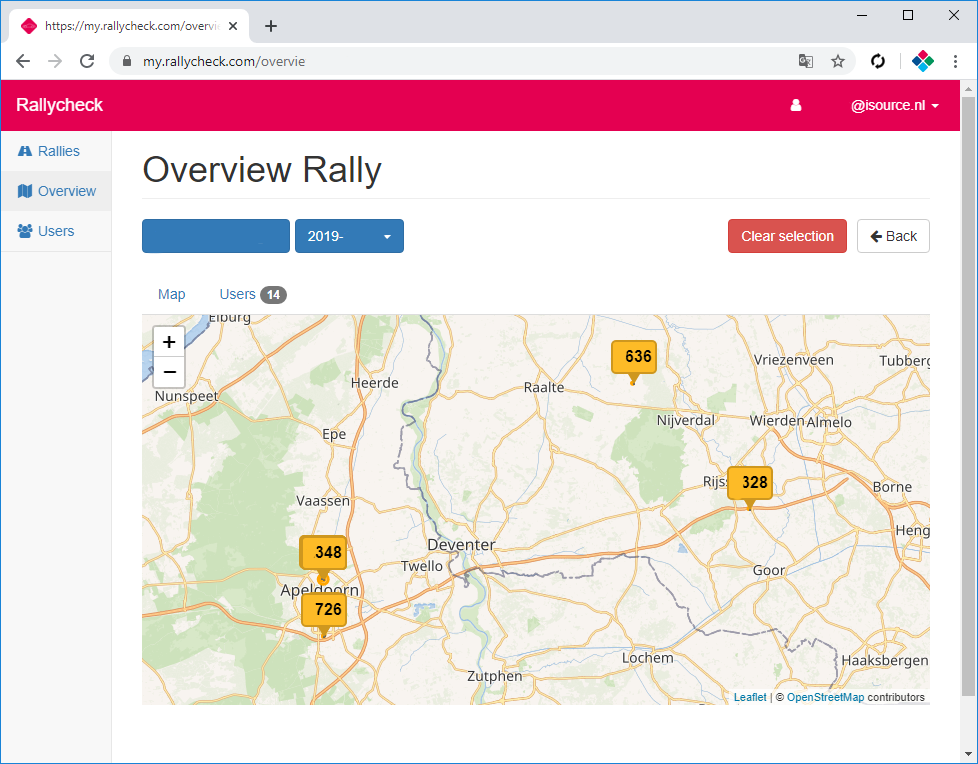
Map
The Map tab is the default view of the page. You will see a map with all the participants. Eacht participant is shown bij Rally ID or Starting number. Participant positions are updated each 3 minutes. The update is per participant, so updating of the positions is a continuous process. When hovering the mouse over a rally id (or starting number) you will see the email address of participants name on screen.
Clicking on a participant brings yo to the “Overview User” page.
Users (n)
The Users tab shows the active users in a list. This may sometimes be easier to manage. The value of n in the tab heading represents the number of active users. The following information is visible.
Nr: a number in the list
id: the Rallycheck id of the participant
Startno.: The starting number of the participants
Username: the Rallycheck user account email
Driver: The first and last name of the Driver
Navigator: The first and last name of the Navigator / Co-driver
Link user: the option to link a user to one of the participants of the rally.
Clicking on a participant brings you to the “See Rally Information” page of a Participant.
12.Colophon
Rallycheck is a product of isource b.v.
isource b.v.
Schipholweg 103
2316 XC Leiden
THE NETHERLANDS
+31 (0)715230114
Information:
rallycheck@isource.nl
https://rallycheck.com
https://support.isource.nl